The challenge in ring pessary management often arrives not at the fitting, but at the follow-up — when a patient with arthritis, reduced hand strength, or post-menopausal atrophy cannot reliably manage insertion or removal on her own. The Pessary Assistant was designed to close that gap. This guide covers device anatomy, compatible shapes, step-by-step technique for both sides, patient selection, sterilization protocol, and a clinical scenario decision table.
What the Pessary Assistant Is (and Is Not)
The Pessary Assistant was invented by Christopher Radpour, MD, a board-certified OB/GYN, whose patients with arthritis or weak hand grip were converting stable self-management candidates into repeat office visitors. The device is injection-molded from FDA-approved medical-grade plastic and designed for use in home, clinic, or hospital settings by a single operator.
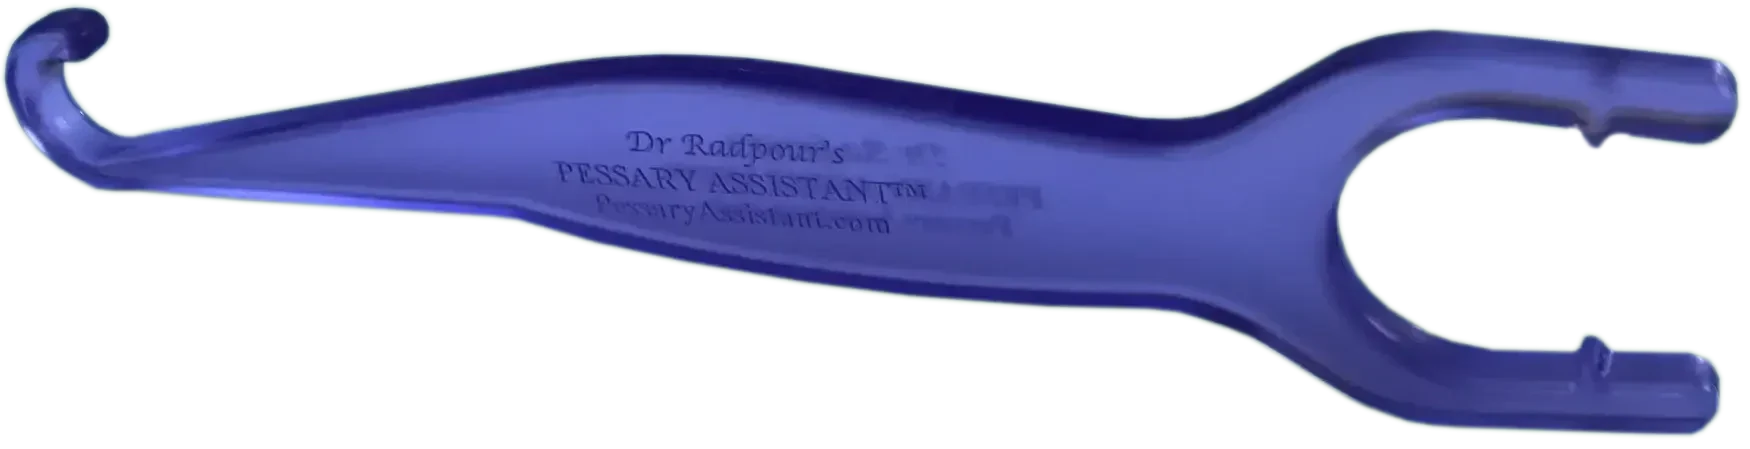
The device has two functional sides:
- “Pessary Assist” side (inverted-U shape): Holds a folded ring pessary in the correct insertion position, reducing the grip strength and fine-motor coordination required for placement.
- “Pessary Hook” side (C-shape): Slides behind the rim of a retained ring pessary to provide mechanical leverage for removal.
Compatible pessary types: Ring (with and without support), Ring with Knob, Incontinence Ring, Oval, and other support pessaries of similar geometry.
Not compatible: Gellhorn, Cube, Donut, and Shaatz pessaries. Neither the U-side nor the C-hook is mechanically suited to space-filling shapes. Document this in the chart; these patients require clinician-managed removal at each follow-up.
The Placement Side — Assisted Insertion Technique
The inverted-U side is most useful for patients who cannot maintain a folded ring pessary with finger grip alone. When training a patient on self-insertion:
- Fold the pessary at the marked indentation points until it seats in the U-shaped holder.
- Apply water-based lubricant to the leading edge of the pessary and the distal end of the device. Avoid oil-based lubricants, which degrade silicone.
- Orient the device so the pessary fold aligns with the vaginal axis — parallel to the floor when standing with one foot elevated, or along the posterior vaginal wall when supine.
- Advance the device in a single controlled motion until the pessary releases into position.
- Withdraw the Pessary Assistant; verify the rim is seated behind the pubic symphysis. The cervix, if present, should remain in the center of the ring.
- Ask the patient to perform a Valsalva maneuver to confirm retention before getting dressed.
Document demonstrated competency before the patient leaves. That notation supports a longer follow-up interval per ACOG guidance on pelvic support management.
The Hook Side — Pessary Removal Technique (the “Pessary Hook”)
The C-shaped pessary hook side reduces the finger strength, wrist extension, and dexterity required to retrieve a ring pessary — useful for patient self-removal and for MA-assisted removal at routine follow-up visits. In patients with post-menopausal atrophy, where increased wall adherence makes finger-hook removal uncomfortable, the rotation-and-tilt motion of the C-hook minimizes traction on the vaginal mucosa.
Step-by-step removal with the pessary hook side:
- Position the patient comfortably — supine, modified lithotomy, seated on a toilet, or standing with one foot elevated on a stool.
- Insert the C-shaped hook posteriorly, directing it toward the posterior rim of the retained ring pessary.
- Hook the rim and apply gentle downward and outward traction with a rotation-and-tilt motion to guide the pessary toward the introitus.
- As the pessary descends to the introitus, allow the vaginal walls to accommodate the exit naturally. Do not force a fold.
- After removal, inspect the pessary for wear, discoloration, or surface irregularities before reprocessing.
The Lone et al. 5-year prospective study of vaginal pessary use identifies self-management capability as one of the strongest predictors of continued pessary use at follow-up. Introducing the hook technique at the initial fitting positions the patient for success from the outset.
Patient Selection — Who Benefits Most
The Pessary Assistant is not required for every ring pessary patient. The table below identifies which profiles benefit from each side:
| Patient Profile | Placement Side Benefit | Hook Side Benefit |
|---|---|---|
| Arthritis or reduced hand grip | High | High |
| Limited fine-motor dexterity (neurologic) | High | High |
| Self-management goal (daily or nightly removal) | High | High |
| Post-menopausal atrophy (tight introitus, adherent walls) | Moderate | Moderate–High |
| Routine follow-up removal by MA or clinician | Low | High |
| Space-filling pessary user (Gellhorn, Cube, Donut) | Not applicable | Not applicable |
Takeaway: The Pessary Assistant is most valuable for patients with dexterity limitations who have a self-management goal. Introducing it at the initial fitting visit can substantially reduce follow-up visit frequency and improve long-term pessary retention.
Introducing the Pessary Assistant to Your Patient
Introduce the Pessary Assistant at the initial fitting, before the patient leaves. Waiting until the first follow-up means the patient has already experienced success or failure at home — and home failure drives discontinuation. A practical protocol:
- Demonstrate the placement side using the pessary just fitted. Have the patient attempt insertion under direct oversight before she gets dressed.
- Demonstrate the hook side with the pessary still in place. Guide the patient’s hand position if dexterity is limited.
- Document in the chart: “Patient instructed in self-insertion and self-removal using Pessary Assistant; demonstrated competency in clinic.”
- Provide written self-care instructions at discharge. For template options, see the pessary patient education materials guide (Cluster 5 in this pillar).
Per AUGS guidance, successfully self-managing patients can extend follow-up to 6–12 months rather than every 3 months — making the Pessary Assistant a practice efficiency tool as much as a patient convenience device.
Safety threshold: Any patient reporting inability to remove the pessary, new or increased discharge, odor, spotting, or pelvic discomfort should be seen promptly regardless of scheduled follow-up. These symptoms require clinical reassessment — not technique adjustment at home.
Cleaning and Sterilization of the Pessary Assistant
The Pessary Assistant contacts vaginal mucosa — a semi-critical device per the CDC Spaulding classification. Minimum standard: high-level disinfection (HLD). Sterilization is preferred when operationally feasible.
Manufacturer-preferred HLD method:
- Pre-clean with soap and warm water; rinse and dry.
- Immerse in Cidex OPA or equivalent (Virex TP is cited by the manufacturer as an acceptable agent) for the full contact time per the disinfectant IFU — 12 minutes at 20°C for Cidex OPA.
- Rinse with sterile or tap water per the disinfectant’s IFU; dry and store covered.
Autoclave alternative: Steam autoclave at 121°C / 15 minutes (gravity cycle) is acceptable. Repeated autoclaving may cause visible clouding or discoloration; the manufacturer notes this does not affect function, but inspect for cracking or deformation before each use and retire the device if any structural change is visible.
Log every reprocessing event: date, method, operator, and any anomalies. Between-patient reprocessing is mandatory. For a full protocol and documentation framework, see the pessary fitting kit reprocessing protocol (Cluster 4 in this pillar).
Common Clinical Scenarios — Quick Decision Guide
Scenario A — Gellhorn user, removal difficulty: The Pessary Assistant is not compatible. Gellhorn removal requires grasping the stem and releasing suction behind the concave face; the C-hook cannot replicate this. This patient requires clinician-managed removal. Consider topical estrogen if atrophy is contributing to adherence.
Scenario B — Ring pessary, self-management goal, mild arthritis: Optimal use case. Train on both sides at the initial fitting, confirm competency in clinic, extend follow-up to 6–12 months. Stock 2–3 units per fitting room for patient purchase at the same visit — available from Minerva alongside the full Ring Fitting Set and Ring with Knob Fitting Set.
Scenario C — MA-assisted routine removal: The hook side reduces physical demand on the MA and patient discomfort, particularly where atrophy is present. No specialized training beyond familiarity with the hook geometry is required.
Scenario D — Patient unable to self-remove despite prior training: Schedule a prompt in-clinic assessment. New inability may indicate increased atrophy, pessary migration, or mucosal changes; speculum exam is appropriate. Consider topical estrogen or a size/shape change if indicated.
Where to Purchase the Pessary Assistant
Minerva stocks the Pessary Assistant alongside the full ring, oval, and incontinence fitting kit assortments. For practices building or expanding a pessary service, see the building a pessary fitting service in your clinic post (Cluster 1 in this pillar) for room setup, MA training scope, and fitting kit selection.
Frequently Asked Questions
What types of pessaries is the Pessary Assistant compatible with?
Ring (with and without support), Ring with Knob, Incontinence Ring, and Oval pessaries. It is not compatible with Gellhorn, Cube, Donut, or Shaatz pessaries. Document incompatibility in the chart for any space-filling pessary patient, as these require clinician-managed removal.
Can a patient use the Pessary Assistant for overnight removal without prior clinical supervision?
No. First use should be performed under direct clinical oversight with documented competency confirmed in clinic before the patient is cleared for unsupervised self-management at home.
How do you sterilize the Pessary Assistant between patients in a clinical setting?
Pre-clean with soap and water, then immerse in a high-level disinfectant (Cidex OPA or equivalent Virex TP) for the full contact time per the disinfectant IFU. Autoclave at 121°C / 15 minutes is an acceptable alternative. Log each reprocessing event; between-patient reprocessing is mandatory.
Is the Pessary Assistant compatible with Gellhorn or Cube pessaries?
No. Gellhorn removal requires a stalk-grasp and suction-release technique; Cube removal requires circumferential suction release. Neither is achievable with the Pessary Assistant. Space-filling pessary patients require clinician-managed removal at follow-up.
At what point in the fitting visit should clinicians introduce the Pessary Assistant?
At the initial fitting visit, before the patient leaves. Patients who demonstrate competency at the first visit can be scheduled for longer follow-up intervals per ACOG/AUGS self-management guidance, reducing appointment burden for both patient and practice.
This article is for informational purposes for healthcare professionals. It does not constitute medical advice or replace clinical judgment. Always follow your institution’s protocols and the manufacturer’s instructions for use.


